Goki is an open-source project that provides a set of frameworks for constructing cross-platform GUIs and other useful tools in pure Go using full-strength tree structures. The name Goki is derived from the word tree in Japanese (木), which is pronounced Ki (き).
This is the multi-page printable view of this section. Click here to print.
Welcome to the Goki Docs!
- 1: General
- 1.1: Migrating to v2
- 1.2: Contribution Guidelines
- 1.3: Struct Field Comments
- 2: Gi
- 2.1: Getting Started
- 2.1.1: Hello World
- 2.1.2: Increment
- 2.2: Examples
- 3: Ki
- 4: Gide
- 5: Pi
- 6: vGPU
- 7: GoSL
- 8: Grid
- 9: GoPix
- 10: Mat32
- 11: Glide
- 12: Grail
1 - General
General project-wide information that applies to all Goki projects.
1.1 - Migrating to v2
How to migrate to v2 (currently incomplete)
Breaking Changes
Goki-wide
- Import paths have been changed from
github.com/goki/*togoki.dev/*(for example,github.com/goki/gichanged togoki.dev/gi). All repositories with a changed import URL that were on version 1 are now on version 2 and have a major version URL suffix (for example,goki.dev/gi/v2) KiT_*global variables have been renamed toType*(for example,KiT_Buttonchanged toTypeButton); fixing this should be a simple find and replace forKiT_=>TypeAddNew*functions and methods have been renamed toNew*(for example,AddNewButtonchanged toNewButton); fixing this should be a simple find a replace forAddNew=>New
goki/ki
- Package
kihas been moved into the root directory of ki, so it is now imported as justgoki.dev/ki/v2 - Support for automatic Ki field children has been removed, so you now have to manage that yourself (see https://github.com/goki/ki/issues/17)
goki/gi/gi
Defaults()method removed on several widgets (slider, spinbox, scrollbar, etc); it is no longer needed and all calls of it can be deleted.MenuButtonwidget removed; useButtoninstead, as you can put a menu on any button. If you want the arrow indicator again, putbutton.Indicator = icons.KeyboardArrowDownActionandButtonBaseremoved; useButtoninstead.Inactiverenamed toDisabledandActivetoEnabled. Many node flag functions (eg,SetInactive,IsActive, etc) as well as the actual enum constants must be renamed.ClearActfield onTextFieldconverted toLeadingIconandTrailingIcon; useAddClearAction()to easily replicate the same functionality.gi.IconNameremoved and replaced withicons.Icon; many functions and fields have changed types that must be updated; also, previous icon names may be broken or have changed to new icons, and it is strongly recommended that you use the new icon constants instead of untyped string literals.- Prop-based styling and configuration removed; set the
Stylefield usingAddStyleFuncfor styling and directly set the configuration struct fields in your code for configuration. - Prefs colors removed; use
gi.ColorSchemeinstead.
goki/gi/gist
- Color transformation functions like
Highlightnow take non-pointer receivers to support function chaining.
goki/gi/units
units.New*functions have been renamed tounits.*(for example,units.NewPxchanged tounits.Px); fixing this should be a simple find and replace forunits.New(although if you useunits.NewValue, which is unchanged, you will have to avoid changing that).- Renamed
(units.Context).ToDotsFactorto(units.Context).Dots - Removed
units.Pctand related things (replaced withunits.Ew,units.Eh,units.Pw,units.Ph, and related things) - Renamed
units.ContextfieldsElW,ElH,VpW, andVpHtoEw,Eh,Vw, andVhrespectively. - Setter functions for
units.Contextnow also take parent size. units.Valuecontains aDotsFuncfunction (you should use keyed struct literals).
1.2 - Contribution Guidelines
How to contribute to Goki projects
Bugs
If you have found a bug with a Goki project, create an issue on the GitHub repository for it, tag it with the label “bug,” and state your operating system and the code you were running in the issue. Also, please provide all relevant information about the bug, like any panic stack traces. We will reply to your issue as soon as possible and do our best to fix it quickly, and you should reply to any questions we ask you.
Feature Requests
If you want a new feature to be added to a Goki project, create an issue on the GitHub repository for it, tag it with the label “enhancement,” and clearly describe the feature, why you want it, and how it can be implemented in the issue. We will reply to your issue as soon as possible and either give a timeline on when we plan to implement it or explain why we will not implement it.
Code Contributions
If you want to fix a bug or add a feature on a Goki project, you should create a pull request on the GitHub repository for it, commit your changes on that pull request, and then request for the pull request to be reviewed. We will review it as quickly as possible, give feedback, and merge it if the changes are good.
Documentation Contributions
To improve the documentation that you are reading right now, you can follow the same steps as above. There are helpful links in the top right corner of every page that allow you to quickly edit pages and create issues about them.
1.3 - Struct Field Comments
How Goki autogenerates struct field comments
How Struct Field Descriptions Work
To be able to read struct field descriptions and use them in the GUI as tooltips, they need to be specified as struct field tags; for example:
type MyStruct struct {
    Field int `desc:"a description"`
}
This has the unfortunate side effect that struct field descriptions are not comments and thus can not be read by editor tools, like the VS Code Go extension. Being able to hover over a field and see its documentation in the editor is incredibly helpful, and it is critical for a good developer experience. As such, we came up with a solution for struct field description comments: a fork of goimports.
The goki/go-tools repository
The goki/go-tools repository is a fork of golang/tools, and it modifies goimports to automatically insert documentation comments for struct fields based on their description tags and other tags. For example, it would change the example struct above to the following:
type MyStruct struct {
    // a description
    Field int `desc:"a description"`
}
We build upon goimports because it is a tool already called in almost all Go editors on save, so it will easily keep struct field comments up to date with no worrying about go generate commands. Any time you add, update, or remove the description for a struct field, the comment will update immediately on save. Also, any changes to the comment will be reverted.
Installation
The struct field comments generated by the tool will be visible in all editors without any extra effort. However, if you are making an app with Goki that uses struct field descriptions or contributing to any of the Goki repositories, you should install the fork of goimports so that you will generate struct field comments. Installation is very simple – you just have to run
go install github.com/goki/go-tools/cmd/goimports@latest
Then, you should configure your editor to run the correct version of goimports. For our Gide editor, there is no more configuration necessary. For VS Code, you should follow these steps:
- Run
which goimportsand copy the result, as you will need it later.- On Windows, run
where goimportsin Command Prompt (not Git Bash like other commands) instead.
- On Windows, run
- Go to Settings and search for
goimports - Set
Go: Format Tooltocustom - In the description for
Go: Format Tool, click onGo: Alternate Tools - Click
Edit in settings.json - Add a new line under
"go.alternateTools": {that says"customFormatter": "{{THE_RESULT_OF_WHICH_GOIMPORTS_THAT_YOU_COPIED}}"(obviously substituting in the thing you copied earlier)- On Windows, you need to run change the result of
where goimportsthat you pasted in by adding an extra backslash to each backslash (for example,C:\Users\me\go\bin\goimports.exewould change toC:\\Users\\me\\go\\bin\\goimports)
- On Windows, you need to run change the result of
After you do those steps, the go section of your settings.json should contain the following lines:
"go.formatTool": "custom",
"go.alternateTools": {
    "customFormatter": "{{THE_RESULT_OF_WHICH_GOIMPORTS_THAT_YOU_COPIED}}"
},
For other editors, you should be able to figure out what to do by doing something similar to the steps for VS Code above, looking at the goimports installation directions, and looking for settings related to goimports and Go tools. If you are unable to figure out how to configure your editor to run the correct goimports tool, please create an issue on the goki/go-tools repository.
2 - Gi
Gi is a pure Go 2D and 3D GUI framework, built on Ki and widely used standards in the web, like CSS for styling and SVG for vector graphics.
Gi is a scenegraph-based 2D and 3D GUI / graphics interface (Gi) in Go, that functions similar to HTML / CSS / SVG and Qt.
NOTE: Requires Go version 1.18+ – now using the new generics.
See the Wiki for more docs (increasingly extensive), Install instructions (mostly basic go build procedure, but does now depend on cgo on all platforms due to glfw, so see details for each platform – for mac you must now install the Vulkan SDK, and Google Groups goki-gi email list, and the new github Discussions tool.
GoGi uses the Goki tree infrastructure to implement a scenegraph-based GUI framework in full native idiomatic Go, with minimal OS-specific backend interfaces based originally on the Shiny drivers, now using go-gl/glfw and vulkan-based vgpu, and supporting MacOS, Linux, and Windows.
The overall design integrates existing standards and conventions from widely-used frameworks, including Qt (overall widget design), HTML / CSS (styling), and SVG (rendering). The core Layout object automates most of the complexity associated with GUI construction (including scrolling), so the programmer mainly just needs to add the elements, and set their style properties – similar to HTML. The main 2D framework also integrates with a 3D scenegraph, supporting interesting combinations of these frameworks (see gi3d package and examples/gi3d). Currently GoGi is focused on desktop systems, but nothing should prevent adaptation to mobile.
See Gide for a complete, complex application written in GoGi (an IDE), and likewise the Emergent neural network simulation environment (the prime motivator for the whole project), along with the various examples in this repository for lots of useful demonstrations – start with the Widgets example which has a bit of a tutorial introduction.
Main Features
Has all the standard widgets:
Button,Menu,Slider,TextField,SpinBox,ComboBoxetc, with tooltips, hover, focus, copy / paste (full native clipboard support), drag-n-drop – the full set of standard GUI functionality. Seegi/examples/widgetsfor a demo of all the widgets.Layoutauto-organizes and auto-sizes everything to configure interfaces that “just work” across different scales, resolutions, platforms. Automatically remembers and reinstates window positions and sizes across sessions, and supports standardCtrl+andCtrl-zooming of display scale.CSS-based styling allows customization of everything – native style properties are HTML compatible (with all standard
em,px,pctetc units), including HTML “rich text” styling for all text rendering (e.g., inLabelwidget) – can decorate any text with inline tags (<strong>,<em>etc), and even include links. Styling is now separated out intogistpackage, for easier navigation.Compiles in seconds, compared to many minutes to hours for comparable alternatives such as Qt, and with minimal cgo dependency. As of April 2019 we now depend on the glfw cross-platform GUI infrastructure system, and as of May 2022 vulkan provides all the rendering (2D via vdraw, 3D via vphong): vgpu.
Fully self-contained – does not use OS-specific native widgets – results in simpler, consistent code across platforms, and is
HiDPIcapable and scalable using standardCtrl/Cmd+Plus or Minuskey, and inPreferences. This also allows a complete 2D GUI to be embedded into a 3D scene, for example.SVGelement (insvgsub-package) supports SVG rendering – used for Icons internally and available for advanced graphics displays – seegi/examples/svgfor viewer and start on editor, along with a number of test .svg files.Model / View paradigm with
reflection-based view elements that display and manipulate all the standard Go types (ingivsub-package), from individual types (e.g., int, float display in aSpinBox, “enum” const int types in aComboBoxchooser) to composite data structures, includingStructVieweditor ofstructfields,MapViewandSliceViewdisplays ofmapandsliceelements (including full editing / adding / deleting of elements), and full-featuredTableViewfor aslice-of-structandTreeViewfor Goki trees.TreeViewenables a built-in GUI editor / inspector for designing gui elements themselves. Just pressControl+Alt+Iin any window to pull up this editor / inspector. Scene graphs can be automatically saved / loaded from JSON files, to provide a basic GUI designer framework – just load and add appropriate connections..
GoGi is a “standard” retained-mode (scenegraph-based) GUI, as compared to immediate-mode GUIs such as Gio. As such, GoGi automatically takes care of everything for you, but as a result you sacrifice control over every last detail. Immediate mode gives you full control, but also the full burden of control – you have to code every last behavior yourself. In GoGi, you have extensive control through styling and closure-based “callback” methods, in the same way you would in a standard front-end web application (so it will likely be more familiar to many users), but if you want to do something very different, you will likely need to code a new type of Widget, which can be more difficult as then you need to know more about the overall infrastructure. Thus, if you are likely to be doing fairly standard things and don’t feel the need for absolute control, GoGi will likely be an easier experience.


Code Overview
There are three main types of 2D nodes:
Viewport2Dnodes that manage their ownimage.RGBAbitmap and can upload that directly to theoswin.Texture(GPU based) that then uploads directly to theoswin.Window. The parentWindowhas a masterViewport2Dthat backs the entire window, and is what mostWidget’s render into.- Popup
DialogandMenu’s have their own viewports that are layered on top of the main window viewport. SVGand its subclassIconare containers for SVG-rendering nodes.
- Popup
Widgetnodes that use the full CSS-based styling (e.g., the Box model etc), are typically placed within aLayout– they useunitssystem with arbitrary DPI to transform sizes into actual rendereddots(term for actual raw resolution-dependent pixels – “pixel” has been effectively co-opted as a 96dpi display-independent unit at this point). Widgets have non-overlapping bounding boxes (BBox– cached for all relevant reference frames).SVGrendering nodes that directly set properties on thegirl.Paintobject and typically have their own geometry etc – they should be within a parentSVGviewport, and their geom units are determined entirely by the transforms etc and we do not support any further unit specification – just raw float values.
General Widget method conventions:
SetValuekinds of methods are wrapped inUpdateStart/End, but do NOT emit a signal.SetValueActioncallsSetValueand emits the signal. This allows other users of the widget that also recv the signal to not trigger themselves, but typically you want the update, so it makes sense to have that in the basic version.ValueViewin particular requires this kind of behavior.
The best way to see how the system works are in the examples directory, and by interactively modifying any existing gui using the interactive reflective editor via Control+Alt+I.
Backend
The oswin and oswin/driver/vkos packages provide interface abstractions for hardware-level implementations, now using vgpu and glfw (version 3.3) provides the basic platform-specific details along with a few other bits of platform-specific code.
All of the main “front end” code just deals with image.RGBA through the girl rendering library, using girl.Paint methods, which was adapted from fogleman/gg, and we use srwiley/rasterx for CPU-based rasterization to the image, which is fast and SVG performant. The vgpu/vdraw package performs optimized GPU texture-based compositing to assemble the final display in a way that minimizes the copying of image data up to the GPU, and supports overlays such as popups and sprites. Any 3D scene elements are accessed directly within the GPU.
Status / News
Version 1.3 released May, 2022, uses the new vulkan based vgpu rendering framework.
Version 1.2 released Feb, 2021, had lots of bug fixes.
Version 1.1 released Nov, 2020, has the styling parameters and code broken out in the gist style package, and basic rendering code, including a complete text layout and rendering system, in the girl render library.
Version 1.0 released April, 2020! The 3D
gi3dcomponent is ready for use, and the code has been widely tested by students and researchers, including extensive testing undergide. The API will remain stable at this point.Active users should join Google Groups goki-gi emailing list to receive more detailed status updates.
Please file Issues for anything that does not work.
3/2019:
pythonwrapper is now available! you can do most of GoGi from python now. See README.md file there for more details.
2.1 - Getting Started
Set up prerequisites, install Gi, and run the Widgets example.
Prerequisites
On all platforms, you must download and install Go from the Go website if you do not already have Go 1.18+ installed.
MacOS
- Install the xcode command-line tools if you don’t already have them by running
xcode-select --install - If you don’t already have the Vulkan SDK installed, install it by doing the following:
- Run
curl -O https://sdk.lunarg.com/sdk/download/latest/mac/vulkan_sdk.dmg - Run
open vulkan_sdk.dmg - Double click
InstallVulkan.app - Follow the installation prompts and ignore all warnings about the Vulkan Portability Enumeration extension
- Run
Windows
- Download and install Git for Windows from the git website if you don’t already have it. You should install Git Bash as part of this process and use it for development.
- Download and install TDM-GCC from this website
- Open Windows Command Prompt and run
cd C:\TDM-GCC-64 - Then, run
mingwvars.bat
Linux
- If you are on Ubuntu or Debian, run
sudo apt-get install libgl1-mesa-dev xorg-dev - If you are on CentOS or Fedora, run
sudo dnf install libX11-devel libXcursor-devel libXrandr-devel libXinerama-devel mesa-libGL-devel libXi-devel libXxf86vm-devel
Installation
Clone the Gi repository by running git clone https://github.com/goki/gi
Try it out!
- Navigate to the widgets example by running
cd gi/examples/widgets - Build the widgets example by running
go build - Run the widgets example by running
./widgetsif you are on MacOS or Linux and./widgets.exeif you are on Windows. This should create a window with a variety of widgets, similar to the screenshot below: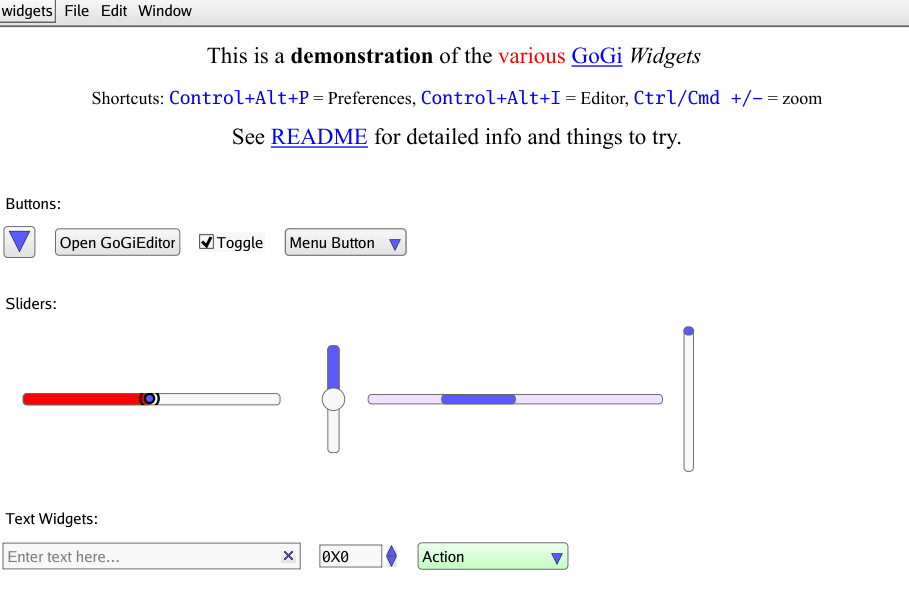
2.1.1 - Hello World
Create a simple Hello World example app with Gi.
Create a new Go project
- Navigate back to your home directory by running
cd - Create a new directory called myapp by running
mkdir myapp - Navigate to your newly created directory by running
cd myapp - Create a new Go module by running
go mod init myapp - Create a new Go file by running
touch main.go - Open main.go using an editor of your choice
Make a simple app
Add the following code to your editor:
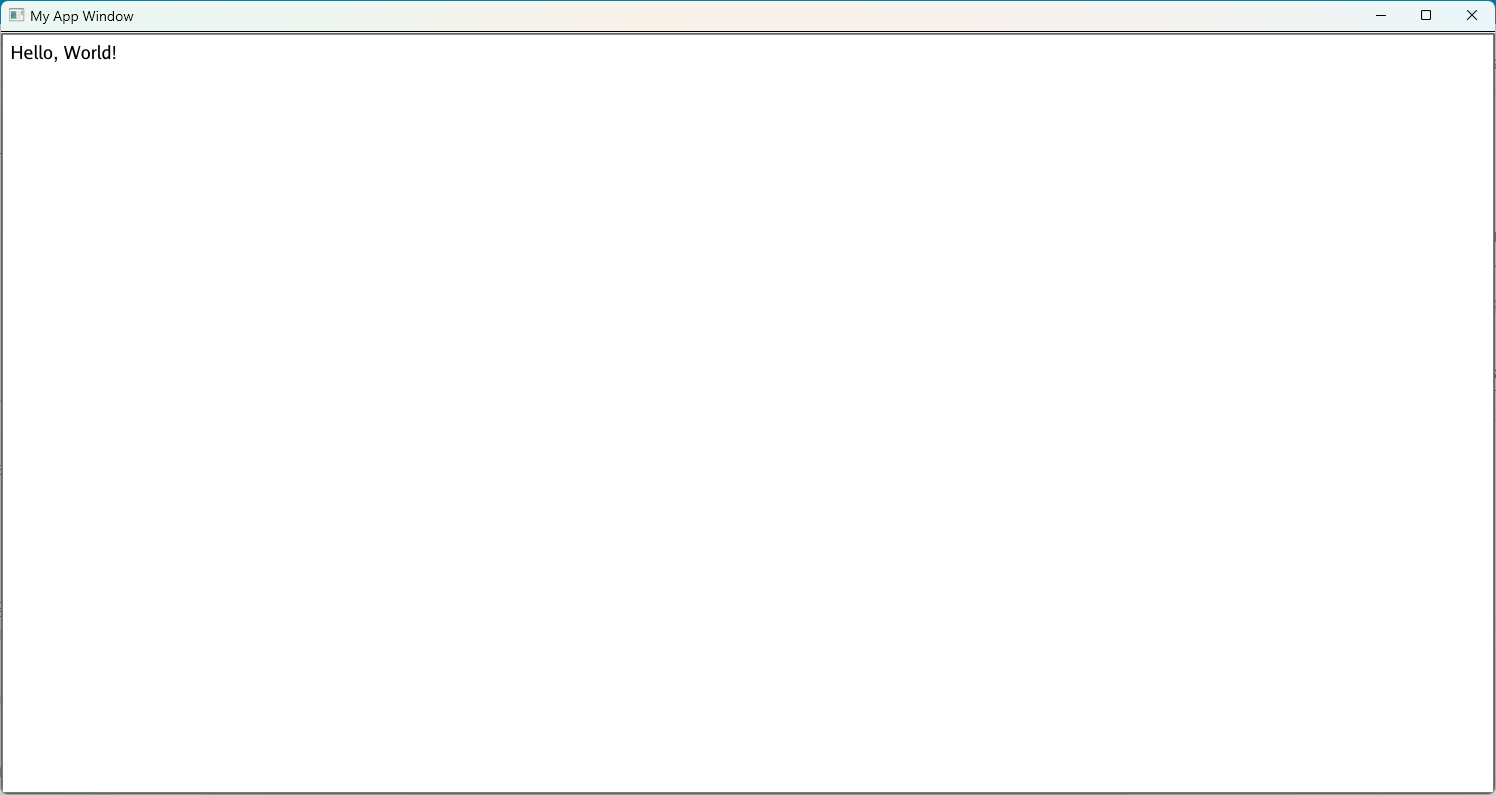
package main

import (
  "github.com/goki/gi/gi"
  "github.com/goki/gi/gimain"
)

func main() {
  // Run the window event loop function as the main function
  gimain.Main(func() {
    mainrun()
  })
}

func mainrun() {
  // Create a window called My App Window with width 512 and height 384
  win := gi.NewMainWindow("myapp", "My App Window", 512, 384)
  // Get the viewport within the window
  vp := win.WinViewport2D()
  // Start a protect update on the viewport
  updt := vp.UpdateStart()
  // Create a standard frame within the window and make it the main widget
  mfr := win.SetMainFrame()

  // Add a label to the main frame with the text "Hello, World!"
  label := gi.AddNewLabel(mfr, "label", "Hello, World!")
  // Make the font size of the label large
  label.SetProp("font-size", "large")

  // End the protected update on the viewport without a signal.
  // Update signals cause things to be redrawn, which is unnecessary at the start
  // because it is already drawing everything new.
  vp.UpdateEndNoSig(updt)
  // Start the event loop that keeps the window rendering.
  // This is a blocking call, and it will not return until
  // the user quits the app or gi.Quit() is called
  win.StartEventLoop()
}
Update your dependencies by running
go mod tidyBuild the code by running
go buildRun the app by running
./myappif you are on MacOS or Linux and./myapp.exeif you are on Windows. This should create a window with text that says “Hello, World,” similar to the screenshot below:
2.1.2 - Increment
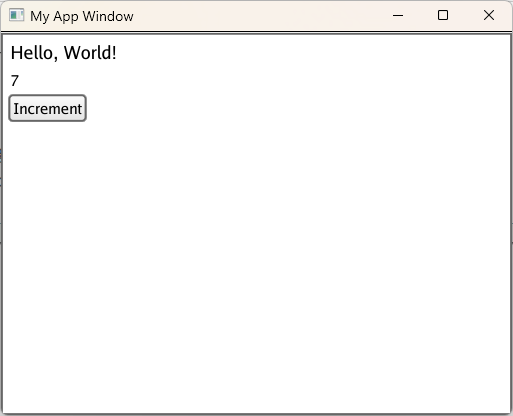
Extend the Hello World example to support incrementing a number by clicking on a button.
In the last section, you built a simple app that says, “Hello, World!” In this section, you will add to that app by creating a button that increments a label. To do that, you need to add the following code after the “Hello, World!” label:
	// Add a new label to the main frame with the text "0"
	// This label will track the number of times the button has been clicked
	numLabel := gi.AddNewLabel(mfr, "numLabel", "0")
	// Make the label redrawable so that it can be updated when the
	// number of times the button has been clicked changes
	numLabel.Redrawable = true
	// Add a new button to the main frame
	button := gi.AddNewButton(mfr, "button")
	// Set the text of the button to "Increment"
	button.Text = "Increment"
	// Keep track of the number of times that the button has been clicked
	numClicked := 0
	// The OnClicked function is called every time the button is clicked
	button.OnClicked(func() {
		// In it, we increment the number of times the button has been clicked
		numClicked++
		// Then, we set the text of the number label to the number of the times
		// the button has been clicked. strconv.Itoa converts integers to strings.
		numLabel.SetText(strconv.Itoa(numClicked))
	})
Then, run go build and ./myapp if you are on MacOS or Linux and ./myapp.exe if you are on Windows. This should create a window similar to the last one, except with a new label and button. Each time you click the Increment button, the number in the new label should increase by 1. If you click the button 7 times, the app should look like this:
3 - Ki
Ki provides trees using the
Ki interface implemented by the Node struct. This supports arbitrarily directed structural trees and standard operations on them.Go language (golang) tree structure (ki = 木 = tree in Japanese)
![]()
![]()
![]()
Overview
See the Wiki for more docs, and Google Groups goki-gi emailing list.
The Tree is one of the most flexible, widely-used data structures in programming, including the DOM structure at the core of a web browser, scene graphs for 3D and 2D graphics systems, JSON, XML, SVG, filesystems, programs themselves, etc. This is because trees can capture most relevant forms of structure (hierarchical groupings, categories, relationships, etc) and are most powerful when they are fully generative – arbitrary new types can be inserted flexibly.
Goki provides a general-purpose tree container type, that can support all of these applications, by embedding and extending the Node struct type that implements the Ki (Ki = Tree in Japanese) interface. Unlike many cases in Go, the need to be able to arbitrarily extend the type space of nodes in the tree within a consistent API, means that the more traditional object-oriented model works best here, with a single common base type, and derived types that handle diverse cases (e.g., different types of widgets in a GUI). Goki stores a Ki interface of each node, enabling correct virtual function calling on these derived types.
A virtue of using an appropriate data representation is that some important operations can be performed particularly concisely and efficiently when they are naturally supported by the data structure. For example, matrices and vectors as supported by numpy or MATLAB provide a concise high-level language for expressing many algorithms.
For trees, Goki leverages the tree structure for automatically computing the appropriate extent of a scenegraph that needs to be updated, with an arbitrary sequence of individual operations, by propagating updating flags through the tree, and tracking the “high water mark” (see UpdateStart / End). This makes the GoGi GUI efficient in terms of what needs to be redrawn, while keeping the code local and simple.
In addition, Goki provides functions that traverse the tree in the usual relevant ways (“natural” me-first depth-first, me-last depth-first, and breadth-first) and take a func function argument, so you can easily apply a common operation across the whole tree in a transparent and self-contained manner, like this:
func (n *MyNode) DoSomethingOnMyTree() {
	n.FuncDownMeFirst(0, nil, func(k Ki, level int, d interface{}) bool {
		mn := KiToMyNode(k) // function converts a Ki to relevant node type -- you must write
		mn.DoSomething()
		...
		return ki.Continue // return value determines whether tree traversal continues or not
	})
}
Many operations are naturally expressed in terms of these traversal algorithms.
Three core Goki features include:
A
Signalmechanism that allows nodes to communicate changes and other events to arbitrary lists of other nodes (similar to the signals and slots from Qt).UpdateStart()andUpdateEnd()functions that wrap around code that changes the tree structure or contents – these automatically and efficiently determine the highest level node that was affected by changes, and only that highest node sends anUpdatedsignal. This allows arbitrarily nested modifications to proceed independently, each wrapped in their own Start / End blocks, with the optimal minimal update signaling automatically computed.ConfigChildrenuses a list of types and names and performs a minimal, efficient update of the children of a node to configure them to match (including no changes if already configured accordingly). This is used during loading from JSON, and extensively in theGoGiGUI system to efficiently re-use existing tree elements. There is often complex logic to determine what elements need to be present in a Widget, so separating that out from then configuring the elements that actually are present is efficient and simplifies the code.
In addition, Ki nodes support a general-purpose Props property map, and the kit (Ki Types) package provides a TypeRegistry and an EnumRegistry, along with various reflect utilities, to enable fully-automatic saving / loading of Ki trees from JSON or XML, including converting const int (enum) values to / from strings so those numeric values can change in the code without invalidating existing files.
Ki Nodes can be used as fields in a struct – they function much like pre-defined Children elements, and all the standard FuncDown* iterators traverse the fields automatically. The Ki Init function automatically names these structs with their field names, and sets the parent to the parent struct. This was essential in the Goki framework to support separate Widget Parts independent of the larger scenegraph.
GoGi Graphical Interface and Gide IDE App
The first and most important application of Goki is the GoGi graphical interface system, in the gi package, and the Gide IDE built on top of GoGi. The scene graph of Ki elements automatically drives minimal refresh updates, and the signaling framework supports gui event delivery and e.g., the “onclick” event signaling from the Button widget, etc. In short, GoGi provides a complete interactive 2D and 3D GUI environment in native Go, in a compact codebase. Part of this is the natural elegance of Go, but Goki enhances that by providing the robust natural primitives needed to express all the GUI functionality. Because GoGi is based around standard CSS styles, SVG rendering, and supports all the major HTML elements, it could even provide a lightweight web browser: Glide.
The GoPi interactive parsing framework also leverages Goki trees to represent the AST (abstract syntax tree) of programs in different langauges. Further, the parser grammar itself is written (in a GUI interactive way) as a tree of parsing elements using Ki nodes.
Code Map
kitpackage:kit.TypesTypeRegistryprovides name-to-type map for looking up types by name, and types can have default properties.kit.EnumsEnumRegistryprovides enum (const int) <-> string conversion, includingbitflagenums. Also has robust generickit.ToIntkit.ToFloatetc converters frominterface{}to specific type, for processing properties, and several utilities inembeds.gofor managing embedded structure types (e.g.,TypeEmbedschecks if one type embeds another, andEmbeddedStructreturns the embedded struct from a given struct, providing flexible access to elements of an embedded type hierarchy – there are also methods for navigating the flattened list of all embedded fields within a struct). Also has akit.Typestruct that supports saving / loading of type information using type names.walkipackage provides tree-walking methods for more ad-hoc, special-case tree traversal, as compared to the standard Func* methods on Ki itself.bitflagpackage: simple bit flag setting, checking, and clearing methods that take bit position args as ints (from const int eunum iota’s) and do the bit shifting from thereki.go=Kiinterface for all major tree node functionality.slice.go=ki.Slice []Kisupports saving / loading of Ki objects in a slice, by recording the size and types of elements in the slice – requireskit.Typestype registry to lookup types by name.props.go=ki.Props map[string]interface{}supports saving / loading of property values using actualstructtypes and named const int enums, using thekittype registries. Used for CSS styling inGoGi.signal.go=Signalthat calls function on a receiver Ki objects that have been previouslyConnected to the signal – also supports signal type so the same signal sender can send different types of signals over the same connection – used for signaling changes in tree structure, and more general tree updating signals.
Status
Feb, 2021: version 1.1.0 reflects major simplification pass to reduce API footprint and remove separate Unique names (names should in general be unique – add a separate non-unique name where needed). Now that GoGi etc is complete, could get rid if quite a few things.
April, 2020: version 1.0.0 release – all stable and well tested.
Simple Example
See ki/node_test.go for lots of simple usage examples. Here’s some code from there that makes a tree with a parent and 2 children.
parent := NodeEmbed{}
parent.InitName(&parent, "par1") // root must be initialized -- this also names it.
typ := reflect.TypeOf(parent)
parent.AddNewChild(typ, "child1") // Add etc methods auto-initialize children
parent.AddNewChild(typ, "child2")

// traverse the tree calling the parent node first and then its children, recursively
// "natural" order
parent.FuncDownMeFirst(0, nil, func(k Ki, level int, d interface{}) bool {
	fmt.Printf("level: %d  node: %s\n", level, k.Path())
	return ki.Continue
})
Trick for fast finding in a slice
Goki takes an extra starting index arg for all methods that lookup a value in a slice, such as ChildByName. The search for the item starts at that index, and goes up and down from there. Thus, if you have any idea where the item might be in the list, it can save (considerable for large lists) time finding it.
Furthermore, it enables a robust optimized lookup map that remembers these indexes for each item, but then always searches from the index, so it is always correct under list modifications, but if the list is unchanged, then it is very efficient, and does not require saving pointers, which minimizes any impact on the GC, prevents stale pointers, etc.
The IndexInParent() method uses this trick, using the cached Node.index value.
Here’s example code for a separate Find method where the indexes are stored in a map:
// FindByName finds item by name, using cached indexes for speed
func (ob *Obj) FindByName(nm string) *Obj {
	if sv.FindIdxs == nil {
		ob.FindIdxs = make(map[string]int) // field on object
	}
	idx, has := ob.FindIdxs[nm]
	if !has {
		idx = len(ob.Kids) / 2 // start in middle first time
	}
	idx, has = ob.Kids.IndexByName(nm, idx)
	if has {
		ob.FindIdxs[nm] = idx
		return ob.Kids[idx].(*Obj)
  	}
	delete(ob.FindIdxs, nm) // must have been deleted
	return nil
}
4 - Gide
Gide is an IDE and IDE framework built using Gi and Pi. It has standard editor features like syntax highlighting, completion, and version control built-in.
Gide is a flexible IDE (integrated development environment) framework in pure Go, using the GoGi GUI (for which it serves as a continuous testing platform :) and the GoPi interactive parser for syntax highlighting and more advanced IDE code processing.
See the Wiki for more docs, Install instructions (go install github.com/goki/gide/cmd/gide@latest should work if GoGi system libraries are in place), and Google Groups goki-gi emailing list.


There are many existing, excellent choices for text editors and IDEs, but Gide is possibly the best pure Go option available. The Go language represents a special combination of simplicity, elegance, and power, and is a joy to program in, and is currently the main language fully-supported by Gide. Our ambition is to capture some of those Go attributes in an IDE.
Some of the main features of Gide include:
Designed to function as both a general-purpose text editor and an IDE. It comes configured with command support for LaTeX, Markdown, and Makefiles, in addition to Go, and the command system is fully extensible to support any command-line tools.
Provides a tree-based file browser on the left, with builtin support for version control (git, svn, etc) and standard file management functionality through drag-and-drop, etc. You can look at git logs, diffs, etc through this interface.
Command actions show output on a tabbed output display on the right, along with other special interfaces such as Find / Replace, Symbols, Debugger, etc. Thus, the overall design is extensible and new interfaces can be easily added to supply new functionality. You don’t spend any time fiddling around with lots of different panels all over the place, and you always know where to look to find something. Maybe the result is less fancy and “bespoke” for a given use-case (e.g., Debugging), but our “giding” principle is to use a simple framework that does most things well, much like the Go language itself.
Strongly keyboard focused, inspired by Emacs – existing Emacs users should be immediately productive. However, other common keyboard bindings are also supported, and key bindings are entirely customizable. If you’re considering actually using it, we strongly recommend reading the Wiki tips to get the most out of it, and understand the key design principles (e.g., why there are no tabs for open files!).
Install
Wiki instructions: Install – for building directly from source.
See Releases on this github page for pre-built OS-specific app packages that install the compiled binaries.
See
installdirectory for OS-specific Makefiles to install apps and build packages.
Current Status
As of April 2020, it is feature complete as a Go IDE, including type-comprehension-based completion, and an integrated GUI debugger, running on top of delve. It is in daily use by the primary developers, and very stable at this point, with the initial 1.0 release now available.
In addition to Issues shown on github, some important features to be added longer-term include:
More coding automation, refactoring, etc. We don’t want to go too crazy here, preferring the more general-purpose and simple approach, but probably some more could be done.
Full support for Python, including extending the GoPi interactive parser to handle Python, so it will have been worth writing instead of just using the native Go parser.
Screenshots
5 - Pi
Pi is an interactive parsing library that uses a simple and robust form of lexing and parsing based on top-down recursive descent.
The pi package supports a simple and robust form of lexing and parsing based on top-down recursive descent, and allows users to create parsers using the GoGi graphical interface system. It is used for syntax highlighting, completion, and more advanced language-structure specific functionality in GoGi and in the Gide IDE / editor (where we need to support multiple different languages, and can’t just rely on the excellent builtin Go parser).
We call it Pi (or GoPi) because Ip is not as easy to pronounce, and also because it makes parsing as easy as pi! You can think of it as a French acronym, which are typically the reverse of English ones – “parseur interactif”. Also, it matches Goki and GoGi.
![]()
![]()
![]()
See the Wiki for more detailed docs, and Google Groups goki-gi emailing list.
The pi repository is also home to various other basic file-level packages including:
filecat– categorizes file types based on suffix and magic cookies, etc. Uses both gabriel-vasile/mimetype and h2non/filetype packages.spell– spell-checking based on sajari/fuzzy.complete– basic completion / lookup infrastructure.lsp– language server protocol interface (incomplete).
Overview of language support
pi/lang.go defines the Lang interface, which each supported language implements (at least a nil stub) – at a minimum the Parser, ParseFile(which includes just lexing if that is all that is needed), and HiLine methods should be implemented, to drive syntax highlighting / coloring / tagging. Optionally, completion, lookup, etc can be implemented. See langs/golang for a full implementation, and langs/tex for a more minimal lex-only case.
pi/langsup.go has tables of supported languages and their properties, in LangProps.
pi in general has overall management methods for coordinating the lex (lexing) and parse parsing steps.
lex also has a variety of random manual and indent functions that are useful for special-case manual parsing cases.
Parsing Strategy
Pi uses a robust, top-down Recursive Descent (RD) parsing technique (see WikiPedia), which is the approach used by most hand-coded parsers, which are by far the most widely used in practice (e.g., for gcc, clang, and Go) for various reasons – see this stack overflow thread too. As far as we can tell (e.g., from this list on WikiPedia ) there are not many recursive-descent parser generators, and none that use the same robust, simple techniques that we employ in GoPi.
Most parsing algorithms are dominated by a strong sequentiality assumption – that you must parse everything in a strictly sequential, incremental, left-to-right, one-token-at-a-time manner. If you step outside of that box (or break with the herd if you will), by loading the entire source in to RAM and processing the entire thing as a whole structured entity (which is entirely trivial these days – even the biggest source code is typically tiny relative to RAM capacity), then much simpler, more robust solutions are possible. In other words, instead of using a “1D” solution with a tiny pinhole window onto the code, we use a 3D solution to parsing (line, char, and nesting depth). This is not good for huge data files (where an optimized, easily parsed encoding format is appropriate), but it is great for programs, which is what GoPi is for.
Specifically, we carve the whole source in to statement-level chunks and then proceed to break that apart into smaller pieces by looking for distinctive lexical tokens anywhere in the statement to determine what kind of statement it is, and then proceed recursively to carve that up into its respective parts, using the same approach. There is never any backtracking or shift-reduce conflicts or any of those annoying issues that plague other approaches – the grammar you write is very directly the grammar of the language, and doesn’t require a lot of random tweaks and special cases to get it to work.
For example, here are the rules for standard binary expressions (in Go or most other languages):
        SubExpr:         -Expr '-' Expr
        AddExpr:         -Expr '+' Expr
        RemExpr:         -Expr '%' Expr
        DivExpr:         -Expr '/' Expr
        MultExpr:        -Expr '*' Expr
and here are some of the more complicated statements (in Go):
    IfStmt {
        IfStmtExpr:  'key:if' Expr '{' ?BlockList '}' ?Elses 'EOS'
        IfStmtInit:  'key:if' SimpleStmt 'EOS' Expr '{' ?BlockList '}' ?Elses 'EOS'
    }
    ForStmt {
       ForRangeExisting:  'key:for' ExprList '=' 'key:range' Expr '{' ?BlockList -'}' 'EOS'
       ForRangeNewLit:  'key:for' NameList ':=' 'key:range' @CompositeLit '{' ?BlockList -'}' 'EOS'
       ...
    }
See the complete grammar for Go for everything, including the lexer rules (at the top).
While GoPi is likely to be a lot easier to use than yacc and bison, the latest version 4 of ANTLR with its ALL(*) algorithm sounds like it offers similar abilities to robustly handle intuitive grammars, and is likely more generalizable to a wider range of languages, and is probably faster overall than GoPi. But GoPi is much simpler and more transparent in terms of how it actually works (disclaimer: I have no idea whatsoever how ANTLR V4 actually works! And that’s kind of the point..). Anyone should be able to understand how GoPi works, and tweak it as needed, etc. And it operates directly in AST-order, creating the corresponding AST on the fly as it parses, so you can interactively understand what it is doing as it goes along, making it relatively easy to create your grammar (although this process is, in truth, always a bit complicated and never as easy as one might hope). And GoPi is fast enough for most uses, taking just a few hundred msec for even relatively large and complex source code, and it processes the entire Go standard library in around 40 sec (on a 2016 Macbook laptop).
Three Steps of Processing
GoPi does three distinct passes through the source file, each creating a solid foundation upon which the next step operates.
Lexer – takes the raw text and turns it into lexical
Tokensthat categorize a sequence of characters as things like aName(identifier – a string of letters and numbers without quotes) or aLiteralof some type, for example aLitStrstring that has some kind of quotes around it, or aLitNumwhich is a number. There is a nice category (Cat) and subcategory (SubCat) level of organization to these tokens (seetoken/token.go). Comments are absorbed in this step as well, and stored in a separate lex output so you can always access them (e.g., for docs), without having to deal with them in the parsing process. The key advantage for subsequent steps is that any ambiguity about e.g., syntactic elements showing up in comments or strings is completely eliminated right at the start. Furthermore, the tokenized version of the file is much more compact and contains only the essential information for parsing.StepTwo – this is a critical second pass through the lexical tokens, performing two important things:
Nesting Depth – all programming languages use some form of parens
( )brackets[ ]and braces{ }to group elements, and parsing must be sensitive to these. Instead of dealing with these issues locally at every step, we do a single pass through the entire tokenized version of the source and compute the depth of every token. Then, the token matching in parsing only needs to compare relative depth values, without having to constantly re-compute that. As an extra bonus, you can use this depth information in syntax highlighting (as we do in Gide).EOS Detection – This step detects end of statement tokens, which provide an essential first-pass rough-cut chunking of the source into statements. In C / C++ / Go and related languages, these are the semicolons
;(in Go, semicolons are mostly automatically computed from tokens that appear at the end of lines – Pi supports this as well). In Python, this is the end of line itself, unless it is not at the same nesting depth as at the start of the line.
Parsing – finally we parse the tokenized source using rules that match patterns of tokens, using the top-down recursive descent technique as described above, starting with those rough-cut statement chunks produced in StepTwo. At each step, nodes in an Abstract Syntax Tree (AST) are created, representing this same top-down broad-to-narrow parsing of the source. Thus, the highest nodes are statement-level nodes, each of which then contain the organized elements of each statement. These nodes are all in the natural functional hierarchical ordering, not in the raw left-to-right order of the source, and directly correspond to the way that the parsing proceeds. Thus, building the AST at the same time as parsing is very natural in the top-down RD framework, unlike traditional bottom-up approaches, and is a major reason that hand-coded parsers use this technique.
Once you have the AST, it contains the full logical structure of the program and it could be further processed in any number of ways. The full availability of the AST-level parse of a Go program is what has enabled so many useful meta-level coding tools to be developed for this language (e.g., gofmt, go doc, go fix, etc), and likewise for all the tools that leverage the clang parser for C-based languages.
In addition, GoPi has Actions that are applied during parsing to create lists of Symbols and Types in the source. These are useful for IDE completion lookup etc, and generally can be at least initially created during the parse step – we currently create most of the symbols during parsing and then fill in the detailed type information in a subsequent language-specific pass through the AST.
RD Parsing Advantages and Issues
The top-down approach is generally much more robust: instead of depending on precise matches at every step along the way, which can easily get derailed by errant code at any point, it starts with the “big picture” and keeps any errors from overflowing those EOS statement boundaries (and within more specific scopes within statements as well). Thus, errors are automatically “sandboxed” in these regions, and do not accumulate. By contrast, in bottom-up parsers, you need to add extensive error-matching rules at every step to achieve this kind of robustness, and that is often a tricky trial-and-error process and is not inherently robust.
Solving the Associativity problem with RD parsing: Put it in Reverse!
One major problem with RD parsing is that it gets the associativity of mathematical operators backwards. To solve this problem, we simply run those rules in reverse: they scan their region from right to left instead of left to right. This is much simpler than other approaches and works perfectly – and is again something that you wouldn’t even consider from the standard sequential mindset. You just have to add a - minus sign at the start of the Rule to set the rule to run in reverse – this must be set for all binary mathematical operators (e.g., BinaryExpr in the standard grammar, as you can see in the examples above).
Also, for RD parsing, to deal properly with the order of operations, you have to order the rules in the reverse order of precedence. Thus, it matches the lowest priority items first, and those become the “outer branch” of the AST, which then proceeds to fill in so that the highest-priority items are in the “leaves” of the tree, which are what gets processed last. Again, using the Pie GUI and watching the AST fill in as things are parsed gives you a better sense of how this works.
Principle of Preemptive Specificity
A common principle across lexing and parsing rules is the principle of preemptive specificity – all of the different rule options are arranged in order, and the first to match preempts consideration of any of the remaining rules. This is how a switch rule works in Go or C. This is a particularly simple way of dealing with many potential rules and conflicts therefrom. The overall strategy as a user is to put the most specific items first so that they will get considered, and then the general “default” cases are down at the bottom. This is hopefully very intuitive and easy to use.
In the Lexer, this is particularly important for the State elements: when you enter a different context that continues across multiple chars or lines, you push that context onto the State Stack, and then it is critical that all the rules matching those different states are at the top of the list, so they preempt any non-state-specific alternatives. State is also avail in the parser but is less widely used.
Generative Expression Subdomains
There are certain subdomains that have very open-ended combinatorial “generative” expressive power. These are particular challenges for any parser, and there are a few critical issues and tips for the Pi parser.
Arithmetic with Binary and Unary Operators
You can create arbitrarily long expressions by stringing together sequences of binary and unary mathematical / logical operators. From the top-down parser’s perspective, here are the key points:
Each operator must be uniquely recognizable from the soup of tokens, and this critically includes distinguishing unary from binary: e.g., correctly recognizing the binary and unary - signs here:
a - b * -cThe operators must be organized in reverse order of priority, so that the lowest priority operations are factored out first, creating the highest-level, broadest splits of the overall expression (in the Ast tree), and then progressively finer, tighter, inner steps are parsed out. Thus, for example in this expression:
if a + b * 2 / 7 - 42 > c * d + e / 72
The broadest, first split is into the two sides of the > operator, and then each of those sides is progressively organized first into an addition operator, then the * and /.
- The binary operators provide the recursive generativity for the expression. E.g., Addition is specified as:
AddExpr: Expr '+' Expr
so it just finds the + token and then descends recursively to unpack each of those Expr chunks on either side, until there are no more tokens left there.
One particularly vexing situation arises if you have the possibility of mixing multiplication with de-pointering, both of which are indicated by the * symbol. In Go, this is particularly challenging because of the frequent use of type literals, including those with pointer types, in general expressions – at a purely syntactic, local level it is ambiguous:
var MultSlice = p[2]*Rule // this is multiplication
var SliceAry = [2]*Rule{}  // this is an array literal
we resolved this by putting the literal case ahead of the general expression case because it matches the braces {} and resolves the ambiguity, but does cause a few other residual cases of ambiguity that are very low frequency.
Path-wise Operators
Another generative domain are the path-wise operators, principally the “selector” operator . and the slice operator '[' SliceExpr ']', which can be combined with method calls and other kinds of primary expressions in a very open-ended way, e.g.,:
ps.Errs[len(ps.Errs)-1].Error()[0][1].String()
In the top-down parser, it is essential to create this open-ended scenario by including pre-and-post expressions surrounding the Slice and Selector operators, which then act like the Expr groups surrounding the AddExpr operator to support recursive chaining. For Selector, the two Expr’s are required, but for Slice, they are optional - that works fine:
Slice: ?PrimaryExpr '[' SliceExpr ']' ?PrimaryExpr
Without those optional exprs on either side, the top-down parser would just stop after getting either side of that expression.
As with the arithmetic case, order matters and in the same inverse way, where you want to match the broader items first.
Overall, processing these kinds of expressions takes most of the time in the parser, due to the very high branching factor for what kinds of things could be there, and a more optimized and language-specific strategy would undoubtedly work a lot better. We will go back and figure out how the Go parser deals with all this stuff at some point, and see what kinds of tricks we might be able to incorporate in a general way in GoPi.
There remain a few low-frequency expressions that the current Go parsing rules in GoPi don’t handle (e.g., see the make test target in cmd/pi directory for the results of parsing the entire Go std library). One potential approach would be to do a further level of more bottom-up, lexer-level chunking of expressions at the same depth level, e.g., the a.b selector pattern, and the []slice vs. array[ab] and func(params) kinds of patterns, and then the parser can operate on top of those. Thus, the purely top-down approach seems to struggle a bit with some of these kinds of complex path-level expressions. By contrast, it really easily deals with standard arithmetic expressions, which are much more regular and have a clear precedence order.
Please see the Wiki for more detailed docs, discussion, etc.
6 - vGPU
vGPU is a Vulkan-based framework for both Graphics and Compute Engine use of GPU hardware in Go.
Mac Installation prerequisite: https://vulkan.lunarg.com/sdk/home – download the Vulkan SDK installer for the mac. Unfortunately there does not appear to be a full version of this on homebrew – the molten-vk package is not enough by itself.
vGPU is a Vulkan-based framework for both Graphics and Compute Engine use of GPU hardware, in the Go langauge. It uses the basic cgo-based Go bindings to Vulkan in: https://github.com/vulkan-go/vulkan and was developed starting with the associated example code surrounding that project. Vulkan is a relatively new, essentially universally-supported interface to GPU hardware across all types of systems from mobile phones to massive GPU-based compute hardware, and it provides high-performance “bare metal” access to the hardware, for both graphics and computational uses.
Vulkan is very low-level and demands a higher-level framework to manage the complexity and verbosity. While there are many helpful tutorials covering the basic API, many of the tutorials don’t provide much of a pathway for how to organize everything at a higher level of abstraction. vGPU represents one attempt that enforces some reasonable choices that enable a significantly simpler programming model, while still providing considerable flexibility and high levels of performance. Everything is a tradeoff, and simplicity definitely was prioritized over performance in a few cases, but in practical use-cases, the performance differences should be minimal.
Selecting a GPU Device
For systems with multiple GPU devices, by default the discrete device is selected, and if multiple of those are present, the one with the most RAM is used. To see what is available and their properties, use:
$ vulkaninfo --summary
The following environment variables can be set to specifically select a particular device by name (deviceName):
MESA_VK_DEVICE_SELECT(standard for mesa-based drivers) orVK_DEVICE_SELECT– for graphics or compute usage.VK_COMPUTE_DEVICE_SELECT– only used for compute, if present – will override above, so you can use different GPUs for graphics vs compute.
vPhong and vShape
The vPhong package provides a complete rendering implementation with different pipelines for different materials, and support for 4 different types of light sources based on the classic Blinn-Phong lighting model. See the examples/phong example for how to use it. It does not assume any kind of organization of the rendering elements, and just provides name and index-based access to all the resources needed to render a scene.
vShape generates standard 3D shapes (sphere, cylinder, box, etc), with all the normals and texture coordinates. You can compose shape elements into more complex groups of shapes, programmatically. It separates the calculation of the number of vertex and index elements from actually setting those elements, so you can allocate everything in one pass, and then configure the shape data in a second pass, consistent with the most efficient memory model provided by vgpu. It only has a dependency on the mat32 package and could be used for anything.
Basic Elements and Organization
GPUrepresents the hardwareDeviceand maintains global settings, info about the hardware.Deviceis a logical device and associated Queue info – each such device can function in parallel.CmdPoolmanages a command pool and buffer, associated with a specific logical device, for submitting commands to the GPU.
Systemmanages multiple vulkanPipelines and associated variables, variable values, and memory, to accomplish a complete overall rendering / computational job. The Memory with Vars and Vals are shared across all pipelines within a System.Pipelineperforms a specific chain of operations, usingShaderprogram(s). In a graphics context, each pipeline typically handles a different type of material or other variation in rendering (textured vs. not, transparent vs. solid, etc).Memorymanages the memory, organized byVarsvariables that are referenced in the shader programs, with each Var having any number of associated values inVals. Vars are organized intoSets that manage their bindings distinctly, and can be updated at different time scales. It has 4 differentMemBuffbuffers for different types of memory. It is assumed that the sizes of all the Vals do not change frequently, so everything is Alloc’d afresh if any size changes. This avoids the need for complex de-fragmentation algorithms, and is maximally efficient, but is not good if sizes change (which is rare in most rendering cases).
Imagemanages a vulkan Image and associatedImageView, including potential host staging buffer (shared as in a Val or owned separately).Textureextends theImagewith aSamplerthat defines how pixels are accessed in a shader.Framebuffermanages anImagealong with aRenderPassconfiguration for managing aRendertarget (shared for rendering onto a windowSurfaceor an offscreenRenderFrame)Surfacerepresents the full hardware-managedImages associated with an actual on-screen Window. One can associate a System with a Surface to manage the Swapchain updating for effective double or triple buffering.RenderFrameis an offscreen render target with Framebuffers and a logical device if being used without any Surface – otherwise it should use the Surface device so images can be copied across them.Unlike most game-oriented GPU setups, vGPU is designed to be used in an event-driven manner where render updates arise from user input or other events, instead of requiring a constant render loop taking place at all times (which can optionally be established too). The event-driven model is vastly more energy efficient for non-game applications.
Memory organization
Memory maintains a host-visible, mapped staging buffer, and a corresponding device-local memory buffer that the GPU uses to compute on (the latter of which is optional for unified memory architectures). Each Val records when it is modified, and a global Sync step efficiently transfers only what has changed. You must allocate and sync update a unique Val for each different value you will need for the entire render pass – although you can dynamically select which Val to use for each draw command, you cannot in general update the actual data associated with these values during the course of a single rendering pass.
Varsvariables define theTypeandRoleof data used in the shaders. There are 3 major categories of Var roles:VertexandIndexrepresent mesh points etc that provide input to Vertex shader – these are handled very differently from the others, and must be located in aVertexSetwhich has a set index of -2. The offsets into allocated Vals are updated dynamically for each render Draw command, so you can Bind different Vertex Vals as you iterate through objects within a single render pass (again, the underlying vals must be sync’d prior).PushConstare push constants that can only be 128 bytes total that can be directly copied from CPU ram to the GPU via a command – it is the most high-performance way to update dynamically changing content, such as view matricies or indexes into other data structures. Must be located inPushConstSetset (index -1).Uniform(read-only “constants”) andStorage(read-write) data that contain misc other data, e.g., transformation matricies. These are also updated dynamically using dynamic offsets, so you can also callBindDynValmethods to select different such vals as you iterate through objects. The original binding is done automatically in the Memory Config (via BindDynVarsAll) and usually does not need to be redone.Texturevars that provide the rawImagedata, theImageViewthrough which that is accessed, and aSamplerthat parameterizes how the pixels are mapped onto coordinates in the Fragment shader. Each texture object is managed as a distinct item in device memory, and they cannot be accessed through a dynamic offset. Thus, a unique descriptor is provided for each texture Val, and your shader should describe them as an array. All such textures must be in place at the start of the render pass, and cannot be updated on the fly during rendering! Thus, you must dynamically bind a uniform variable or push constant to select which texture item from the array to use on a given step of rendering.- There is a low maximum number of Texture descriptors (vals) available within one descriptor set on many platforms, including the Mac, only 16, which is enforced via the
MaxTexturesPerSetconst. There are two (non mutually-exclusive) strategies for increasing the number of available textures: - Each individual Texture can have up to 128 (again a low limit present on the Mac) layers in a 2d Array of images, in addition to all the separate texture vals being in an Array – arrays of arrays. Each of the array layers must be the same size – they are allocated and managed as a unit. The
szallocpackage provides manager for efficiently allocating images of various sizes to these 16 x 128 (or any N’s) groups of layer arrays. This is integrated into theValsvalue manager and can be engaged by callingAllocTexBySizethere. The texture UV coordinates need to be processed by the actual pct size of a given texture relative to the allocated group size – this is all done in thevphongpackage and thetexture_frag.fragfile there can be consulted for a working example. - If you allocate more than 16 texture Vals, then multiple entire collections of these descriptors will be allocated, as indicated by the
NTextureDescsonVarSetandVars(see that for more info, and thevdrawDrawmethod for an example). You can useVars.BindAllTextureValsto bind all texture vals (iterating over NTextureDescs), andSystem.CmdBindTextureVarIdxto automatically bind the correct set. +, here’s someglslshader code showing how to use thesampler2DArray, as used in thevdrawdraw_frag.fragfragment shader code:
- There is a low maximum number of Texture descriptors (vals) available within one descriptor set on many platforms, including the Mac, only 16, which is enforced via the
#version 450
#extension GL_EXT_nonuniform_qualifier : require

// must use mat4 -- mat3 alignment issues are horrible.
// each mat4 = 64 bytes, so full 128 byte total, but only using mat3.
// pack the tex index into [0][3] of mvp,
// and the fill color into [3][0-3] of uvp
layout(push_constant) uniform Mtxs {
	mat4 mvp;
	mat4 uvp;
};

layout(set = 0, binding = 0) uniform sampler2DArray Tex[]; //
layout(location = 0) in vec2 uv;
layout(location = 0) out vec4 outputColor;

void main() {
	int idx = int(mvp[3][0]);   // packing into unused part of mat4 matrix push constant
	int layer = int(mvp[3][1]);
	outputColor = texture(Tex[idx], vec3(uv,layer)); // layer selection as 3rd dim here
}
Vars are accessed at a givenlocationorbindingnumber by the shader code, and these bindings can be organized into logical sets called DescriptorSets (see Graphics Rendering example below). In HLSL, these are specified like this:[[vk::binding(5, 1)]] Texture2D MyTexture2;for descriptor 5 in set 1 (set 0 is the first set).- You manage these sets explicitly by calling
AddSetorAddVertexSet/AddPushConstSetto create newVarSets, and then addVars directly to each set. Valsrepresent the values of Vars, with eachValrepresenting a distinct value of a correspondingVar. TheConfigValscall on a givenVarSetspecifies how many Vals to create per each Var within a Set – this is a shared property of the Set, and should be a consideration in organizing the sets. For example, Sets that are per object should contain one Val per object, etc, while others that are per material would have one Val per material.- There is no support for interleaved arrays – if you want to achieve such a thing, you need to use an array of structs, but the main use-case is for VertexInput, which actually works faster with non-interleaved simple arrays of vec4 points in most cases (e.g., for the points and their normals).
- You can allocate multiple bindings of all the variables, with each binding being used for a different parallel threaded rendering pass. However, there is only one shared set of Vals, so your logic will have to take that into account (e.g., allocating 2x Vals per object to allow 2 separate threads to each update and bind their own unique subset of these Vals for their own render pass). See discussion under
Textureabout how this is done in that case. The number of such DescriptorSets is configured inMemory.Vars.NDescs(defaults to 1). Note that these are orthogonal to the number ofVarSets – the terminology is confusing. Various methods take adescIdxto determine which such descriptor set to use – typically in a threaded swapchain logic you would use the acquired frame index as the descIdx to determine what binding to use.
- You manage these sets explicitly by calling
Naming conventions
Newreturns a new objectInitoperates on existing object, doing initialization needed for subsequent setting of optionsConfigoperates on an existing object and settings, and does everything to get it configured for use.Destroydestroys allocated vulkan objectsAllocis for allocating memory (vs. making a new object)Freeis for freeing memory (vs. destroying an object)
Graphics Rendering
See https://developer.nvidia.com/vulkan-shader-resource-binding for a clear description of DescriptorSets etc.
Here’s a widely-used rendering logic, supported by the GoGi Scene (and tbd std Pipeline), and how you should organize the Uniform data into different sets at each level, to optimize the binding overhead:
for each view {
  bind view resources [Set 0]         // camera, environment...
  for each shader type (based on material type: textured, transparent..) {
    bind shader pipeline
    bind shader resources [Set 1]    // shader control values (maybe none)
    for each specific material {
      bind material resources  [Set 2] // material parameters and textures
      for each object {
        bind object resources  [Set 3] // object transforms
        draw object [VertexInput binding to locations]
        (only finally calls Pipeline here!)
      }
    }
  }
}
It is common practice to use different DescriptorSets for each level in the swapchain, for maintaining high FPS rates by rendering the next frame while the current one is still cooking along itself – this is the NDescs parameter mentioned above.
Because everything is all packed into big buffers organized by different broad categories, in Memory, we exclusively use the Dynamic mode for Uniform and Storage binding, where the offset into the buffer is specified at the time of the binding call, not in advance in the descriptor set itself. This has only very minor performance implications and makes everything much more flexible and simple: just bind whatever variables you want and that data will be used.
The examples and provided vPhong package retain the Y-is-up coordinate system from OpenGL, which is more “natural” for the physical world, where the Y axis is the height dimension, and up is up, after all. Some of the defaults reflect this choice, but it is easy to use the native Vulkan Y-is-down coordinate system too.
Combining many pipeline renders per RenderPass
The various introductory tutorials all seem to focus on just a single simple render pass with one draw operation, but any realistic scene needs different settings for each object! As noted above, this requires dynamic binding, which is good for Uniforms and Vertex data, but you might not appreciate that this also requires that you pre-allocate and sync up to device memory all the Vals that you will need for the entire render pass – the dynamic binding only selects different offsets into memory buffers, but the actual contents of those buffers should not change during a single render pass (otherwise things will get very slow and lots of bad sync steps might be required, etc). The Memory system makes it easy to allocate, update, and dynamically bind these vals.
Here’s some info on the logical issues:
Stack Overflow discussion of the issues.
NVIDIA github has explicit code and benchmarks of different strategies.
This blog has a particularly clear discussion of the need for Texture arrays for managing textures within a render pass. This is automatically how Texture vars are managed .
GPU Accelerated Compute Engine
See examples/compute1 for a very simple compute shader, and compute.go for Compute* methods specifically useful for this case.
See the gosl repository for a tool that converts Go code into HLSL shader code, so you can effectively run Go on the GPU.
Here’s how it works:
Each Vulkan
Pipelineholds 1 computeshaderprogram, which is equivalent to akernelin CUDA – this is the basic unit of computation, accomplishing one parallel sweep of processing across some number of identical data structures.You must organize at the outset your
VarsandValsin theSystemMemoryto hold the data structures your shaders operate on. In general, you want to have a single static set of Vars that cover everything you’ll need, and different shaders can operate on different subsets of these. You want to minimize the amount of memory transfer.Because the
vkQueueSubmitcall is by far the most expensive call in Vulkan, you want to minimize those. This means you want to combine as much of your computation into one big Command sequence, with calls to various differentPipelineshaders (which can all be put in one command buffer) that gets submitted once, rather than submitting separate commands for each shader. Ideally this also involves combining memory transfers to / from the GPU in the same command buffer as well.Although rarely used in graphics, the most important tool for synchronizing commands within a single command stream is the vkEvent, which is described a bit in the Khronos Blog. Much of vulkan discussion centers instead around
Semaphores, but these are only used for synchronization between different commands — each of which requires a differentvkQueueSubmit(and is therefore suboptimal).Thus, you should create named events in your compute
System, and inject calls to set and wait on those events in your command stream.
Mac Platform
To have the mac use the libMoltenVK.dylib installed by brew install molten-vk, you need to change the LDFLAGS here:
github.com/goki/vulkan/vulkan_darwin.go
#cgo darwin LDFLAGS: -L/opt/homebrew/lib -Wl,-rpath,/opt/homebrew/lib -F/Library/Frameworks -framework Cocoa -framework IOKit -framework IOSurface -framework QuartzCore -framework Metal -lMoltenVK -lc++
However it does not find the libvulkan which is not included in molten-vk.
Platform properties
See MACOS.md file for full report of properties on Mac.
These are useful for deciding what kinds of limits are likely to work in practice:
4 max bound descriptor sets: keep below this in general. https://vulkan.gpuinfo.org/displaydevicelimit.php?name=maxBoundDescriptorSets&platform=all
maxPerStageDescriptorSamplers is only 16 on mac – this is the relevant limit on textures! also SampledImages is basically the same: https://vulkan.gpuinfo.org/displaydevicelimit.php?name=maxPerStageDescriptorSamplers&platform=all https://vulkan.gpuinfo.org/displaydevicelimit.php?name=maxPerStageDescriptorSampledImages&platform=all
This is a significant constraint! need to work around it.
- 8 dynamic uniform descriptors (mac has 155) https://vulkan.gpuinfo.org/displaydevicelimit.php?name=maxDescriptorSetUniformBuffersDynamic&platform=all
Note that this constraint is largely irrelevant because each dynamic descriptor can have an unlimited number of offset values used for it.
128 push constant bytes actually quite prevalent: https://vulkan.gpuinfo.org/displaydevicelimit.php?name=maxPushConstantsSize&platform=all
image formats: https://vulkan.gpuinfo.org/listsurfaceformats.php
helpful info on dxc compiler, which is best for HLSL inputs: https://github.com/microsoft/DirectXShaderCompiler/blob/main/docs/SPIR-V.rst
7 - GoSL
GoSL implements Go as a shader language for GPU compute shaders by converting Go code to HLSL, and then using the glslc compiler to compile into an
.spv SPIR-V file that can be loaded into a vulkan compute shader.gosl implements Go as a shader language for GPU compute shaders: converts Go code to HLSL, and then uses the glslc compiler (e.g., from a vulkan package) to compile into an .spv SPIR-V file that can be loaded into a vulkan compute shader. glslc must be installed!
Thus, gosl enables the same CPU-based Go code to also be run on the GPU. The relevant subsets of Go code to use are specifically marked using //gosl: comment directives, and this code must only use basic expressions and concrete types that will compile correctly in a shader (see Restrictions below). Method functions and pass-by-reference pointer arguments to struct types are supported and incur no additional compute cost due to inlining (see notes below for more detail).
See examples/basic and examples/axon examples (simple and much more complicated, respectively), using the vgpu Vulkan-based GPU compute shader system.
You must also install goimports which is used on the extracted subset of Go code:
$ go install golang.org/x/tools/cmd/goimports@latest
To install the gosl command, do:
$ go install github.com/goki/gosl@latest
In your Go code, use these comment directives:
//gosl: start <filename>

< Go code to be translated >

//gosl: end <filename>
to bracket code to be processed. The resulting converted code is copied into a shaders subdirectory created under the current directory where the gosl command is run, using the filenames specified in the comment directives. Each such filename should correspond to a complete shader program (i.e., a “kernel”), or a file that can be included into other shader programs. Code is appended to the target file names in the order of the source .go files on the command line, so multiple .go files can be combined into one resulting HLSL file.
HLSL specific code, e.g., for the main compute function or to specify #include files, can be included either by specifying files with a .hlsl extension as arguments to the gosl command, or by using a //gosl: hlsl comment directive as follows:
//gosl: hlsl <filename>

// <HLSL shader code to be copied>

//gosl: end <filename>
where the HLSL shader code is commented out in the .go file – it will be copied into the target filename and uncommented. The HLSL code can be surrounded by /* */ comment blocks (each on a separate line) for multi-line code (though using a separate .hlsl file is preferable in this case).
For .hlsl files, their filename is used to determine the shaders destination file name, and they are automatically appended to the end of the corresponding .hlsl file generated from the Go files – this is where the main function and associated global variables should be specified.
IMPORTANT: all .go, .hlsl, and .spv files are removed from the shaders directory prior to processing to ensure everything there is current – always specify a different source location for any custom .hlsl files that are included.
Usage
gosl [flags] [path ...]
The flags are:
-exclude string
	comma-separated list of names of functions to exclude from exporting to HLSL (default "Update,Defaults")
-out string
	output directory for shader code, relative to where gosl is invoked (default "shaders")
-keep
	keep temporary converted versions of the source files, for debugging
Note: any existing .go files in the output directory will be removed prior to processing, because the entire directory is built to establish all the types, which might be distributed across multiple files. Any existing .hlsl files with the same filenames as those extracted from the .go files will be overwritten. Otherwise, you can maintain other custom .hlsl files in the shaders directory, although it is recommended to treat the entire directory as automatically generated, to avoid any issues.
gosl path args can include filenames, directory names, or Go package paths (e.g., github.com/goki/mat32/fastexp.go loads just that file from the given package) – files without any //gosl: comment directives will be skipped up front before any expensive processing, so it is not a problem to specify entire directories where only some files are relevant. Also, you can specify a particular file from a directory, then the entire directory, to ensure that a particular file from that directory appears first – otherwise alphabetical order is used. gosl ensures that only one copy of each file is included.
Any struct types encountered will be checked for 16-byte alignment of sub-types and overall sizes as an even multiple of 16 bytes (4 float32 or int32 values), which is the alignment used in HLSL and glsl shader languages, and the underlying GPU hardware presumably. Look for error messages on the output from the gosl run. This ensures that direct byte-wise copies of data between CPU and GPU will be successful. The fact that gosl operates directly on the original CPU-side Go code uniquely enables it to perform these alignment checks, which are otherwise a major source of difficult-to-diagnose bugs.
Restrictions
In general shader code should be simple mathematical expressions and data types, with minimal control logic via if, for statements, and only using the subset of Go that is consistent with C. Here are specific restrictions:
Types
Can only use
float32,[u]int32, and their 64 bit versions for basic types, andstructtypes composed of these same types – no other Go types (i.e.,map, slices,string, etc) are compatible. There are strict alignment restrictions on 16 byte (e.g., 4float32’s) intervals that are enforced via thealignslsub-package.Use
slbool.Boolinstead ofbool– it defines a Go-friendly interface based on aint32basic type. Using aboolin auniformstructcauses an obscureglslccompiler error:shaderc: internal error: compilation succeeded but failed to optimize: OpFunctionCall Argument <id> '73[%73]'s type does not match FunctionAlignment and padding of
structfields is key – this is automatically checked bygosl.HLSL does not support enum types, but standard go
constdeclarations will be converted. Use anint32oruint32data type. It will automatically deal with the simple incrementingiotavalues, but not more complex cases. Also, for bitflags, define explicitly, not usingbitflagspackage.HLSL does not do multi-pass compiling, so all dependent types must be specified before being used in other ones, and this also precludes referencing the current type within itself. todo: can you just use a forward declaration?
HLSL does not provide the same auto-init-to-zero for declared variables – safer to initialize directly:
    val := float32(0) // guaranteed 0 value
    var val float32 // not guaranteed to be 0!  avoid!
Syntax
Cannot use multiple return values, or multiple assignment of variables in a single
=expression.Can use multiple variable names with the same type (e.g.,
min, max float32) – this will be properly converted to the more redundant C form with the type repeated.
Random numbers: slrand
See slrand for a shader-optimized random number generation package, which is supported by gosl – it will convert slrand calls into appropriate HLSL named function calls. gosl will also copy the slrand.hlsl file, which contains the full source code for the RNG, into the destination shaders directory, so it can be included with a simple local path:
//gosl: hlsl mycode
// #include "slrand.hlsl"
//gosl: end mycode
Performance
With sufficiently large N, and ignoring the data copying setup time, around ~80x speedup is typical on a Macbook Pro with M1 processor. The rand example produces a 175x speedup!
Implementation / Design Notes
HLSL is very C-like and provides a much better target for Go conversion than glsl. See examples/basic/shaders/basic_nouse.glsl vs the .hlsl version there for the difference. Only HLSL supports methods in a struct, and performance is the same as writing the expression directly – it is suitably inlined.
While there aren’t any pointers allowed in HLSL, the inlining of methods, along with the use of the inout InputModifier, effectively supports pass-by-reference. The stackoverflow on this is a bit unclear but the basic example demonstrates that it all goes through.
Links
Key docs for HLSL as compute shaders:
8 - Grid
Grid is a Go SVG vector drawing program, built using Gi and based on Inkscape.
Grid is a GoGi-based SVG vector drawing program, with design based on Inkscape.
If an acronym is required, how about: “Go-rendered interactive drawing” program.
Behavior
multiple select actions keep doing down even inside groups, so it is easy to operate inside groups but group is the “default”
Alt on control knobs -> rotate instead of clicking again to get rotation knobs – this is compatible with above and better :)
Install
The simple Go install command should work, for modules mode:
$ go get github.com/goki/grid/cmd/grid
See Goki Install for more information and prereqs for different platforms – if you encounter any difficulties, ensure that Goki works first.
Exporting PNG and PDF depends on https://inkscape.org – on the Mac you need to make a link to /usr/local/bin and likewise for Linux:
$ sudo ln -s /Applications/Inkscape.app/Contents/MacOS/inkscape /usr/local/bin/
Design
Similar to inkscape in overall layout, and read / write inkscape compatible SVG files.
Main horiz toolbar(s) across top – top one is static, bottom one is dynamic based on selection / tool mode.
Left vert toolbar with drawing tools
Left panel with drawing structure. This is just like GiEditor tree – provides direct access as needed. In particular this provides layer-level organization – always have a layer group by default, and can drag items into different layers, and also have view and freeze flags on layers. usu only show layer level, and selection there determines which layer things are added to!
Main middle panel with drawing. Grid underlay is a separate image that is drawn first, updated with any changes.
Right tab panel with all the controls, just like gide in terms of tab & Inkscape overall. tabs are easier to find vs. inkscape.
code in main grid package provides all the editors for right tabs.
Status
Basic functionality now in place:
create: rect, ellipse, line, text, import image
full basic paint settings (gradients, markers, etc), and text properties, editing
dynamic guide alignment, Align panel
basic node editor – can move the main points, not the extra control points
full undo / redo for everything.
Preferences
TODO:
double-click on text brings up text bar and text panel
add more layer logic – if layers, everything should be in a layer?
import svg – same as marker
add group / ungroup to context menu (conditional on selection n etc)
implement the full transform panel
render gradient icons
show selected path node in diff color.. red? node sel map
rest of line props – easy
dropper = grab style from containsnode, apply to selection – don’t affect selection!
svg.Node ToPath – convert any node to a path
node editor – big job but needed for making basic bezier curves..
esc aborts new el drag
add distribute to Align
svg.Text align Center, etc affects different tspans within overall text block
Text edit panel – finish toolbar
cut / paste not updating tree reliably. more tree update debugging fun!
use grid itself to render all new icons!
figure out mask clipping eventually.
LINKS
Inkscape special flags
https://wiki.inkscape.org/wiki/index.php/Inkscape_SVG_vs._plain_SVG
9 - GoPix
GoPix is a keyboard-navigable Go picture management app.
Go picture management app, because Mac Photos bricked my entire photo library upon updating to Catalina…

Install
See install dir for Makefiles that install official app per different OS standards.
Goals
simple, entirely file-based design – no databases. just write to exif meta data on images themselves. so everything is future-proof and no lockin. (does have a .json file cache, but it can be fully regenerated from exif..)
sync with e.g., google drive using the drive sync thing.
use gimp for photo retouching, or preview
File Structure
- Main dir:
~/Pix - All images live in one common directory:
~/Pix/All - Folders for specific albums have symbolic links to original pics in
../All/img.jpg - DND / Copy/Paste operations create these symlinks, except if going into the trash – or all
TODO
rotate left not working! maybe just on helif?
add refresh from exif button
select-all
10 - Mat32
Mat32 is a float32 based vector and matrix package for 2D and 3D graphics that uses a value-based design.
mat32 is a float32 based vector and matrix package for 2D & 3D graphics, based on the G3N math32 package, but using a value-based design instead of pointer-based, which simplifies chained expressions of multiple operators.
The go-gl/mathgl package is also comparable, which in turn is based on image/math/f32 types, which use arrays instead of structs with named X, Y, Z components. The named components make things easier to read overall. The G3N and this package support a much more complete set of vector and matrix math, covering almost everything you might need, including aggregate types such as triangles, planes, etc.
This package also includes the Matrix class from fogleman/gg (as Mat2) for 2D graphics – this also includes additional support for SVG-style configuring of a matrix, in the SetString method.
Value-based Vectors
The use of value-based methods means that vectors are passed and returned as values instead of pointers:
So, in this mat32 package, Add looks like this:
// Add adds other vector to this one and returns result in a new vector.
func (v Vec3) Add(other Vec3) Vec3 {
	return V3(v.X + other.X, v.Y + other.Y, v.Z + other.Z)
}
versus G3N:
// Add adds other vector to this one.
// Returns the pointer to this updated vector.
func (v *Vector3) Add(other *Vector3) *Vector3 {
	v.X += other.X
	v.Y += other.Y
	v.Z += other.Z
	return v
}
The value-based design allows you to just string together sequences of expressions naturally, without worrying about allocating intermediate variables:
// Normal returns the triangle's normal.
func Normal(a, b, c Vec3) Vec3 {
	nv := c.Sub(b).Cross(a.Sub(b))
   ...
There may be a small performance cost for the value-based approach (comparative benchmarks have not yet been run), but the overall simplicity advantages are significant.
The matrix types still do use pointer-based logic because they are significantly larger and thus the performance issues are likely to be more important.
Struct vs. Array Performance: Struct is much faster
This is a benchmark from Egon Elbre, showing that small arrays can be significantly slower than a struct: https://github.com/egonelbre/exp/blob/master/bench/vector_fusing/vector_test.go
# array
BenchmarkAddMul-32                      70589480                17.3 ns/op
# struct
BenchmarkStructAddMul-32                1000000000               0.740 ns/op
Discussion: https://github.com/golang/go/issues/15925
11 - Glide
Glide will be a lightweight internet display engine (HTML renderer and web browser), built using Gi.
Glide is GoGi-based Lightweight Internet Display Engine (i.e., a web browser in native Go)
No plans to actually write this for a while, but just bookmarking the name, which fits with the other major apps based on GoGi, featuring the same basic letters (gide, grid, glide).
Glide connotes a lightweight floating feeling as you surf the gentle breezes of the interwebs. And the lightweight nature of the codebase, which leverages the extensive HTML / CSS based nature of GoGi, so that the main work is just parsing the HTML and turning it into the DOM tree, which is just the corresponding GoGi scenegraph. Probably have to add a few tweaks and widgets or something but really basic rendering should happen almost immediately, which is what will lead to a seductive feeling of gliding through development, which will result in entirely too much time spent in coding bliss :)
And to what end? The inevitable existential question: does the world need another web browser? Certainly not!
And getting all the details right is a “long tailed process” with diminishing returns.
Hence, Glide will focus on getting just the basics right-enough, to support things like a help browser for HTML-formatted help information, and various other forms of static content. There are various JS implementations in pure Go (right?) and interfacing those to the GoGi DOM should be relatively easy (right?), so basic functionality there could be pretty entertaining. All those Go backends could finally run on a Go frontend!
12 - Grail
Grail will be an email app, using Glide for HTML rendering of messages, featuring full keyboard-based navigation and markup-based message formatting.
Grail is a (planned) email app in the GoGi GUI framework.
Just bookmarking the name for now. Grail rhymes with mail, and has the same GoGi family sound.. and your golden challice of messages is overflowing or something like that.
Once the glide html rendering engine is working, then a natural next step would be an email app. Presumably the relevant protocols are supported in some Go library, maybe even the standard library? So then a basic email app seems relatively easy, and could provide a highly keyboard-centic efficient interface for email processing. For example, the mac Mail.app does not natively support filing emails into folders through keyboard actions – does everyone seriously do this using the mouse? I use the MsgFiler add-on, together with the Keyboard Maestro keymapping app to make this happen, but it is still a pain every time they update the app, and searching has been rather flaky too.
Still, as usual, it is not like it is actually worth it at a purely rational level to write a whole email app, but once all the pieces are there, it is just too compelling to resist…
With grail and glide in place, together with gide and grid, all of the core desktop productivity apps would be available within this one framework, at least for latex / markdown based document management. You might need a spreadsheet at some point, but maybe a line can be drawn there..
Design
Keep-it-simple design, basically just like mac Mail.app, with a TreeView folder view on the left, message list next, and then message display, with popup window for composing new messages.
Key features:
Remove attachments that actually works
keyboard-based filing of messages
Maybe some kind of markdown-based simple html formatter – you write markdown, it translates to html and sends? That would be nice.