Gi is a scenegraph-based 2D and 3D GUI / graphics interface (Gi) in Go, that functions similar to HTML / CSS / SVG and Qt.
NOTE: Requires Go version 1.18+ – now using the new generics.
See the Wiki for more docs (increasingly extensive), Install instructions (mostly basic go build procedure, but does now depend on cgo on all platforms due to glfw, so see details for each platform – for mac you must now install the Vulkan SDK, and Google Groups goki-gi email list, and the new github Discussions tool.
GoGi uses the Goki tree infrastructure to implement a scenegraph-based GUI framework in full native idiomatic Go, with minimal OS-specific backend interfaces based originally on the Shiny drivers, now using go-gl/glfw and vulkan-based vgpu, and supporting MacOS, Linux, and Windows.
The overall design integrates existing standards and conventions from widely-used frameworks, including Qt (overall widget design), HTML / CSS (styling), and SVG (rendering). The core Layout object automates most of the complexity associated with GUI construction (including scrolling), so the programmer mainly just needs to add the elements, and set their style properties – similar to HTML. The main 2D framework also integrates with a 3D scenegraph, supporting interesting combinations of these frameworks (see gi3d package and examples/gi3d). Currently GoGi is focused on desktop systems, but nothing should prevent adaptation to mobile.
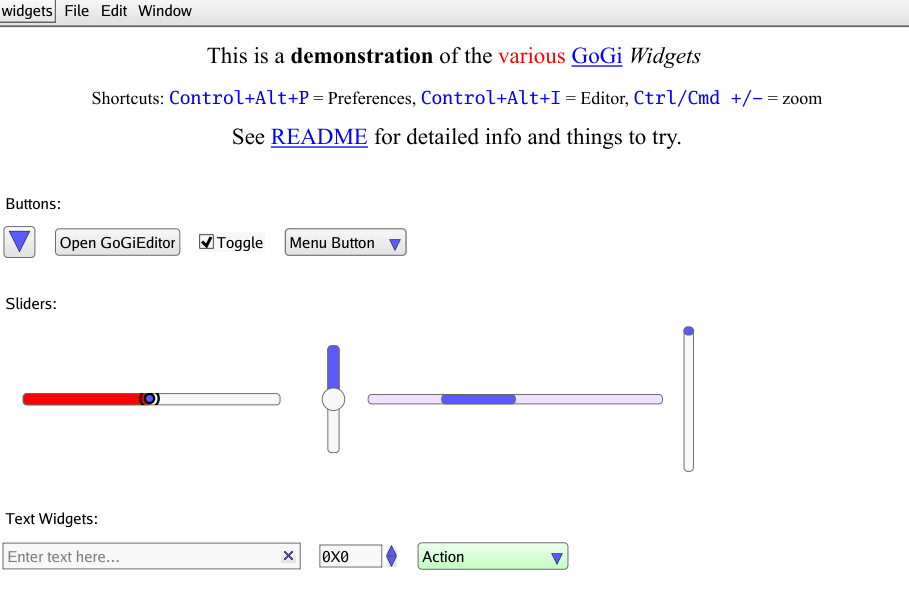
See Gide for a complete, complex application written in GoGi (an IDE), and likewise the Emergent neural network simulation environment (the prime motivator for the whole project), along with the various examples in this repository for lots of useful demonstrations – start with the Widgets example which has a bit of a tutorial introduction.
Main Features
Has all the standard widgets:
Button,Menu,Slider,TextField,SpinBox,ComboBoxetc, with tooltips, hover, focus, copy / paste (full native clipboard support), drag-n-drop – the full set of standard GUI functionality. Seegi/examples/widgetsfor a demo of all the widgets.Layoutauto-organizes and auto-sizes everything to configure interfaces that “just work” across different scales, resolutions, platforms. Automatically remembers and reinstates window positions and sizes across sessions, and supports standardCtrl+andCtrl-zooming of display scale.CSS-based styling allows customization of everything – native style properties are HTML compatible (with all standard
em,px,pctetc units), including HTML “rich text” styling for all text rendering (e.g., inLabelwidget) – can decorate any text with inline tags (<strong>,<em>etc), and even include links. Styling is now separated out intogistpackage, for easier navigation.Compiles in seconds, compared to many minutes to hours for comparable alternatives such as Qt, and with minimal cgo dependency. As of April 2019 we now depend on the glfw cross-platform GUI infrastructure system, and as of May 2022 vulkan provides all the rendering (2D via vdraw, 3D via vphong): vgpu.
Fully self-contained – does not use OS-specific native widgets – results in simpler, consistent code across platforms, and is
HiDPIcapable and scalable using standardCtrl/Cmd+Plus or Minuskey, and inPreferences. This also allows a complete 2D GUI to be embedded into a 3D scene, for example.SVGelement (insvgsub-package) supports SVG rendering – used for Icons internally and available for advanced graphics displays – seegi/examples/svgfor viewer and start on editor, along with a number of test .svg files.Model / View paradigm with
reflection-based view elements that display and manipulate all the standard Go types (ingivsub-package), from individual types (e.g., int, float display in aSpinBox, “enum” const int types in aComboBoxchooser) to composite data structures, includingStructVieweditor ofstructfields,MapViewandSliceViewdisplays ofmapandsliceelements (including full editing / adding / deleting of elements), and full-featuredTableViewfor aslice-of-structandTreeViewfor Goki trees.TreeViewenables a built-in GUI editor / inspector for designing gui elements themselves. Just pressControl+Alt+Iin any window to pull up this editor / inspector. Scene graphs can be automatically saved / loaded from JSON files, to provide a basic GUI designer framework – just load and add appropriate connections..
GoGi is a “standard” retained-mode (scenegraph-based) GUI, as compared to immediate-mode GUIs such as Gio. As such, GoGi automatically takes care of everything for you, but as a result you sacrifice control over every last detail. Immediate mode gives you full control, but also the full burden of control – you have to code every last behavior yourself. In GoGi, you have extensive control through styling and closure-based “callback” methods, in the same way you would in a standard front-end web application (so it will likely be more familiar to many users), but if you want to do something very different, you will likely need to code a new type of Widget, which can be more difficult as then you need to know more about the overall infrastructure. Thus, if you are likely to be doing fairly standard things and don’t feel the need for absolute control, GoGi will likely be an easier experience.


Code Overview
There are three main types of 2D nodes:
Viewport2Dnodes that manage their ownimage.RGBAbitmap and can upload that directly to theoswin.Texture(GPU based) that then uploads directly to theoswin.Window. The parentWindowhas a masterViewport2Dthat backs the entire window, and is what mostWidget’s render into.- Popup
DialogandMenu’s have their own viewports that are layered on top of the main window viewport. SVGand its subclassIconare containers for SVG-rendering nodes.
- Popup
Widgetnodes that use the full CSS-based styling (e.g., the Box model etc), are typically placed within aLayout– they useunitssystem with arbitrary DPI to transform sizes into actual rendereddots(term for actual raw resolution-dependent pixels – “pixel” has been effectively co-opted as a 96dpi display-independent unit at this point). Widgets have non-overlapping bounding boxes (BBox– cached for all relevant reference frames).SVGrendering nodes that directly set properties on thegirl.Paintobject and typically have their own geometry etc – they should be within a parentSVGviewport, and their geom units are determined entirely by the transforms etc and we do not support any further unit specification – just raw float values.
General Widget method conventions:
SetValuekinds of methods are wrapped inUpdateStart/End, but do NOT emit a signal.SetValueActioncallsSetValueand emits the signal. This allows other users of the widget that also recv the signal to not trigger themselves, but typically you want the update, so it makes sense to have that in the basic version.ValueViewin particular requires this kind of behavior.
The best way to see how the system works are in the examples directory, and by interactively modifying any existing gui using the interactive reflective editor via Control+Alt+I.
Backend
The oswin and oswin/driver/vkos packages provide interface abstractions for hardware-level implementations, now using vgpu and glfw (version 3.3) provides the basic platform-specific details along with a few other bits of platform-specific code.
All of the main “front end” code just deals with image.RGBA through the girl rendering library, using girl.Paint methods, which was adapted from fogleman/gg, and we use srwiley/rasterx for CPU-based rasterization to the image, which is fast and SVG performant. The vgpu/vdraw package performs optimized GPU texture-based compositing to assemble the final display in a way that minimizes the copying of image data up to the GPU, and supports overlays such as popups and sprites. Any 3D scene elements are accessed directly within the GPU.
Status / News
Version 1.3 released May, 2022, uses the new vulkan based vgpu rendering framework.
Version 1.2 released Feb, 2021, had lots of bug fixes.
Version 1.1 released Nov, 2020, has the styling parameters and code broken out in the gist style package, and basic rendering code, including a complete text layout and rendering system, in the girl render library.
Version 1.0 released April, 2020! The 3D
gi3dcomponent is ready for use, and the code has been widely tested by students and researchers, including extensive testing undergide. The API will remain stable at this point.Active users should join Google Groups goki-gi emailing list to receive more detailed status updates.
Please file Issues for anything that does not work.
3/2019:
pythonwrapper is now available! you can do most of GoGi from python now. See README.md file there for more details.